Strength training after 50 at home does not require a rack of weights or an athletic past. It requires a few movements you can repeat with control, enough resistance to challenge your muscles, and the patience to progress gradually.
The goal is not to leave every session exhausted. It is to make everyday tasks feel more manageable: carrying shopping, climbing stairs, getting up from a low seat, catching your balance. This beginner plan uses a chair, a wall and either light dumbbells or filled water bottles.
- Why this matters more after 50
- Strength Training After 50 at Home: Before Your First Session
- Warm up first
- The six exercise home plan
- How hard should the exercises feel?
- A realistic four week progression
- How to make each exercise easier or harder
- How to tell it is working before the numbers change
- Common mistakes that slow progress
- Coming back after a break
- Questions beginners often ask
- Make the plan easy to repeat
Why this matters more after 50
Muscle mass and power tend to decline with age, especially when activity levels fall, and the National Institute on Aging’s guidance on the types of exercise older adults need describes strength work as key to slowing that loss and to helping prevent falls. A meta-analysis of resistance training trials in adults aged 60 and over reported gains in upper limb, lower limb and grip strength, and in the physical functioning domain of quality of life, although six minute walking distance did not consistently improve. Resistance exercise works best alongside aerobic activity, balance practice, adequate food and recovery. It is one part of healthy ageing, not a shortcut around the rest.
The CDC’s activity guidance for older adults recommends muscle strengthening activity on at least two days each week, as well as aerobic and balance work. The World Health Organization’s 2020 recommendations on physical activity set the same two day minimum for adults aged 65 and over, and add varied multicomponent activity emphasising functional balance and strength on three or more days a week. Our guide to muscle loss with ageing explains why consistency matters more than chasing rapid gains.
Strength Training After 50 at Home: Before Your First Session
Choose a stable, armless chair that will not slide. Clear loose rugs and clutter. Wear shoes that grip the floor, and keep water nearby. If you have chest symptoms, unexplained dizziness, a recent operation, an uncontrolled heart or blood pressure condition, or a painful joint problem, ask a qualified clinician what is appropriate before starting.
During each exercise, use a range of motion you can control. Mild muscular effort is expected; sharp pain, faintness, chest pressure or unusual breathlessness is a reason to stop.
Warm up first
Walk around the room for two minutes. Perform five easy sit to stands, five wall push ups and five unweighted hip hinges. Practise the first repetition of each exercise slowly before adding resistance. The warm up should leave you prepared rather than tired.
Long stretching sessions are optional. A lighter version of the movement you are about to perform is usually the most direct preparation. If tight hips stop you settling into a comfortable position on the chair squat or the hinge, a few mobility exercises for stiff hips are a sensible addition to the warm up. If a joint remains painful after warming up, change the exercise instead of forcing more range.
The six exercise home plan
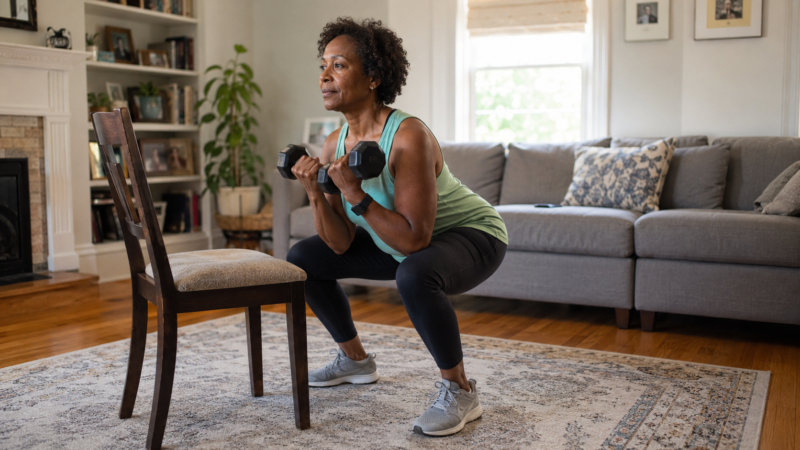
- Chair squat: Stand in front of the chair with feet about hip width apart. Reach your hips back, touch the seat lightly, then stand. Use your hands on the chair if necessary. Do 6 to 10 repetitions.
- Wall push up: Place your palms on a wall at chest height. Keep your body in a straight line as you bend and straighten your elbows. Do 6 to 12 repetitions.
- Supported split squat: Hold the chair, place one foot slightly behind you and lower only as far as feels steady. Do 5 to 8 repetitions per side.
- One arm row: Support one hand on the chair. Pull a light weight toward your ribs without twisting your trunk. Do 8 to 12 repetitions per side.
- Hip hinge: With soft knees, push your hips backwards while keeping your spine comfortably long, then stand tall. Begin without weight. Do 8 to 12 repetitions.
- Calf raise: Hold the chair and slowly rise onto the balls of your feet, then lower. Do 8 to 15 repetitions.

Complete one round during week one. Rest 45 to 90 seconds when you need it. If the session feels manageable and your joints feel normal the next day, build toward two rounds. The movements in our fall prevention guide can add simple balance practice on separate days.
How hard should the exercises feel?
A useful starting target is an effort of about 5 to 7 on a 10 point scale by the final repetitions: challenging, but with your technique still intact. Judging load by effort in this way has some direct support in this age group: a small validation study in twelve adults aged 60 and over found that a perceived effort rating could set resistance band training intensity reliably without any maximal strength test, though twelve participants is a slender basis for a firm rule. For a band-based version with setup and anchoring guidance, see our resistance band workout for beginners. Finish most sets feeling that you could perform another two or three good repetitions. If you could easily do ten more, add a small amount of resistance or slow the lowering phase. If your form breaks down, reduce the load or repetitions.
A realistic four week progression
- Week 1: one round, twice during the week.
- Week 2: two rounds if recovery is comfortable.
- Week 3: add one or two repetitions to selected exercises.
- Week 4: add a small amount of resistance to movements that now feel easy.
Leave at least one recovery day between sessions at first. A walk, ordinary household movement or gentle mobility work is fine on the days between. For a broader weekly framework, see our evidence based guide to strength, cardio and balance for longevity.
How to make each exercise easier or harder
Most beginner plans fail at the edges rather than in the middle. An exercise is either too hard on day one and gets abandoned, or it stays easy for months because the only way anyone knows to progress is to add weight they do not own. Every movement in this plan can be adjusted in both directions without buying anything.
| Exercise | To make it easier | To make it harder |
|---|---|---|
| Chair squat | Use a higher seat, push through your hands | Lower seat, pause briefly at the bottom, hold a weight at your chest |
| Wall push up | Stand closer to the wall, more upright | Step your feet further back, or use a kitchen counter instead |
| Supported split squat | Hold the chair with both hands, shorten the range | One hand, then fingertips, then a slightly deeper range |
| One arm row | Lighter weight, more support through the other arm | Slow the lowering to three seconds before adding weight |
| Hip hinge | No weight, smaller range, hands sliding down your thighs | Hold a weight close to your legs, pause at the bottom |
| Calf raise | Both feet, both hands on the chair | Pause at the top, then progress toward one leg with support |
Two rules make this work. Change one thing at a time, so that when something feels different you know why. And exhaust the free progressions before reaching for load: range, tempo and support all make a movement harder without any new equipment, and they tend to improve technique on the way rather than papering over it.
Slowing the lowering phase is the most underrated of these. Taking three seconds to sit down into the chair squat, rather than dropping, increases the work considerably while making the movement safer rather than riskier. It is usually the right next step for anyone who feels ready to progress but is not confident adding weight.
How to tell it is working before the numbers change
The load you lift is the slowest signal to move, which is unfortunate, because it is the one everybody watches. Earlier and more reliable signs show up in ordinary tasks, and they are worth noticing deliberately because they are easy to miss.
Standing from a low chair without pushing off the arms. Carrying the shopping in one trip instead of two. Getting up from the floor with less negotiation. Fewer small wobbles when you turn quickly or step off a kerb. Climbing a flight of stairs without arriving at the top out of breath. These are the changes that the plan is actually for, and most people notice at least one of them before they can add a single kilogram.
A second reliable marker is recovery. If the same session that left you stiff for two days in week one leaves you comfortable by the next morning in week four, you have adapted, even though the numbers in your notebook look identical. That is a legitimate reason to progress, and it is often the moment to do so.
What is not a useful marker is soreness. It reflects novelty more than effectiveness, it fades as you become trained, and chasing it tends to push people into sessions they cannot repeat. A plan you can do again on Thursday beats one that impresses you on Monday.
Common mistakes that slow progress
Doing the exercises quickly can turn a strength session into a balance test. Breathe continuously, lower the weight with control and stop the set before technique becomes untidy. Avoid changing six things at once: increase repetitions, load or sets not all three in the same week.
Soreness is not proof that a workout worked. A little stiffness can occur after a new routine, but severe or worsening pain deserves attention. Sleep and adequate protein containing meals also support recovery; supplements are not required for everyone.
Coming back after a break
Do not double the next workout. Repeat the last comfortable session, or reduce it by one set. After illness, wait until normal daily tasks feel manageable and follow any advice from the clinician who treated you. The first session back should give you information, not prove your fitness.
Several weeks away may justify returning to a single round. Strength rebuilds steadily when the workload goes up in small steps, and a written record of your last good session stops frustration from setting the pace.
Questions beginners often ask
Can I start with no weights?
Yes. Body weight, a wall and a chair provide useful resistance. Add weight only when the movement is stable and the current version no longer feels challenging.
Is twice a week enough?
Twice weekly full body sessions are a sensible starting pattern and align with public health guidance. The NHS physical activity guidelines for older adults ask for activities that improve strength, balance and flexibility on at least two days a week, in addition to the weekly aerobic total. More is not automatically better if it reduces recovery or makes the habit difficult to maintain.
What if one knee or shoulder hurts?
Do not push through sharp or escalating pain. Shorten the range, reduce resistance or use a different movement. Persistent pain, swelling, weakness or loss of function should be assessed by an appropriate health professional.
Make the plan easy to repeat
Put two sessions in your calendar and keep the equipment visible. Record the exercise, load and repetitions in a notebook. After four weeks, progress only the movements that are clearly ready. The best beginner programme is not the most dramatic one; it is the one you can perform safely enough to keep doing.